Benchmade Griptilian Knife

Hey Everyone. I recently was given a new Benchmade Knife for my birthday. As a guy who is usually firmly in the camp of, “I wouldn’t pay that much for a knife”, my opinion has immediately been changed!

I’ve used many cheaper Buck knifes or other various “Big-5 sale” knifes, with good success. But, once you pick up and use one of these Benchmade knives, be prepared for your opinion of the more budget friendly knife to be changed for the worse.

Benchmade started out in California in 1988 and is now located in Oregon, where they have been since 1990. They pride themselves on making high quality knives using “non-traditional materials and modern manufacturing methods in not only building knives better but, inevitably building better knives.”

In line with their statement, I have to say, I’m really impressed with the build quality and general functionality of the knife. It has a nice weight to it, so it feels great in the hand and it’s very well made. Everything works super smoothly and opens with one hand without any issues.

This particular knife uses their patented Axis locking design. I’ve never used a knife with a design like it, but I really like it. It provides a firm lock, but is easy to disengage, and is ambidextrous. Here is the companies blurb on the Axis system.

“AXIS® A patented Benchmade exclusive, AXIS® has been turning heads and winning fans ever since its introduction. A 100-percent ambidextrous design, AXIS® gets its function from a small, hardened steel bar which rides forward and back in a slot machined into both steel liners. The bar extends to both sides of the knife, spans the liners, and is positioned over the rear of the blade. It engages a ramped, tang portion of the knife blade when it is opened. Two omega style springs, one on each liner, give the locking bar its inertia to engage the knife tang. As a result, the tang is wedged solidly between a sizable stop pin and the AXIS® bar itself. Available in manual, assist or automatic configurations.”

Overall, this is a really great knife. I would highly recommend checking one out, and if you are in the “I wouldn’t pay that much for a knife” camp, I urge you to go to a store that sells these and give one a try. If you already want one, you can order them from Amazon, http://l.santsys.com/12WGwyu.

To check out more information on Benchmade, check out their website, http://www.benchmade.com/. Also, watch a video review of the knife below!

AR-15 Completed Build

I finally got most of the parts for my AR-15 build up and got everything put together.

Here is a parts breakdown:

The first thing I want to really point out is the fit of the upper and lower. I have a Smith and Wesson MP15T AR-15 and when you grab the pistol grip, there is noticeable wobble between the upper and lower. They are just not “precision” fit. With the Coronado Arms lower and BCM upper, there is absolutely no wobble. Everything is an exact fit. I try to outline some of that in the review video at the bottom of this post.

This was my first from the ground up build, and I was surprised how easily everything went together. I’m really looking forward to getting this rifle out to the range and seeing how it shoots!

I’m waiting on getting a CA legal bullet button and then I will get to the range and a range report and video will follow. Please subscribe to my youtube channel to get updates on when I get everything put up. http://l.santsys.com/12QMPDE

Vortex Sparc Red Dot

I recently decided to get a Red Dot for my AR-15 build out, I opted to go with the Vortex Sparc Red Dot. I mostly decided to go with it after the review by Mac on the Military Arms Chanel. He does a good review and some durability tests. Check it out.

Some things to note, I’ve found that with red dots and holographic sights, the way my eye is, causes the dot to be a little misshapen and not clear. This is my eye, and not the optic. In the video below I discuss some of the details around that and show some pictures and video of the reticle. Check it out!

You can pick one of these optics up on Amazon for $199, http://l.santsys.com/14MwsXs

Coronado Arms Lower Build

I finally got my lower parts kit for my Coronado Arms lower build out. I used a lower parts kit from PSA. The parts kit was a basic kit with a Magpul MOE stock and grip in Flat Dark Earth.

Everything went together well and looks great! Check out the video below for all of the details!

Coronado Arms Lower Receiver

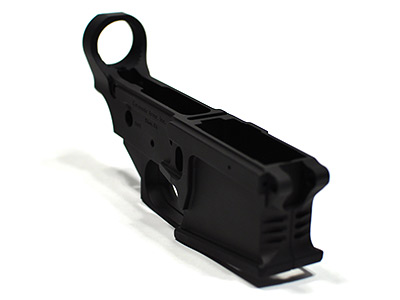
I’ve been wanting to do an AR-15 build, from the ground up, for quite some time now. With the rush going on, it’s been hard to find parts, etc. But I was recently able to get my hands on a stripped lower receiver.

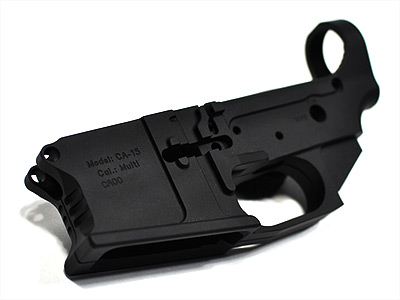
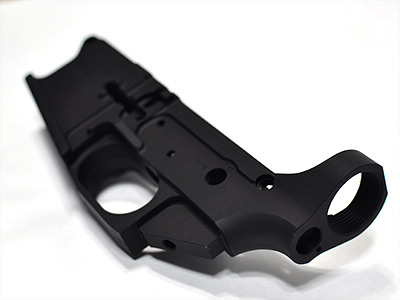
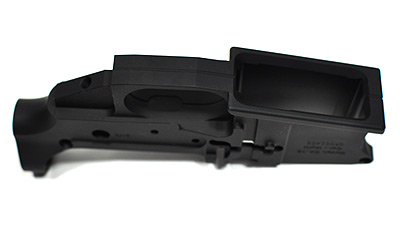
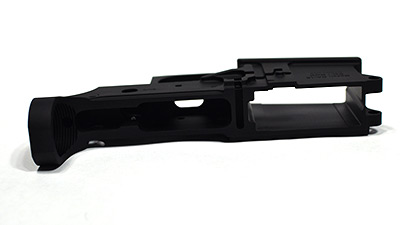
I picked up a Coronado Arms billet lower receiver (Model CA-15). This is my first billet receiver, my M&P15T has a forged lower, and every other AR-15 I’ve ever shot/handled has been forged. The CA-15 is made from 7075-T6 aluminium, with a black hard anodized finish. I’m excited to see how everything goes together and eventually shoots.

The overall look and feel of the lower is great. It’s light, but feels very sturdy and has extremely clean lines. Everything seems to be machined perfectly. There is no “extra” material and everything just looks precision about it.

I can’t wait to get my parts kit so I can build this thing out!


For the parts kit, I ordered a Palmetto State Armory (PSA) setup. It is a complete lower kit including a buffer tube and stock. It has a basic Magpul MOE stock, I haven’t had a lot of experience with Magpul stuff, so I’m looking forward to checking that out too. I went with PSA because it has decent reviews, it was a good price, and it was also instock. Finding parts here in California has been difficult at best.

As soon as the parts start rolling in I’ll do follow up posts on everything.

Theis Holsters IWB

I recently purchased a Theis Holsters Inside the Waistband (IWB) holster… It’s a form of cross bread holster, part Kydex and part leather. In my limited experiences, I’m finding that this form of holster is much more comfortable because it molds to your body better. I’ve found with pure Kydex style holsters, they are more one-size fits all, so they usually cause some uncomfortable pinching or just feel strange, especially after many hours of wear.

For IWB carry, I like something that is easy for holstering, drawing and then re-holstering a firearm. It’s much smoother for training, and I find more convenient for the simple things like just putting your pants and belt on. I also prefer something that maintains its shape a bit better. So all of that is boiling down to the fact that I like something that is part Kydex. So the best of both worlds, in my mind, is the cross-bread type holsters.

Breaking it down, Theis Holsters offers holsters in multiple fashions (IWB and OWB) and for a very large collection of firearms. I’m just going to cover the IWB holster, because that is what I have.

The options for the IWB holsters, once you choose your firearm type, are the type of leather you want (horsehide or cowhide), the type of clips you want (metal, Kydex, or J-Clips), and finally if you want standard or full muzzle coverage.

For my holster, I chose horsehide, metal clips and the standard muzzle coverage.

I decided to go with the horsehide per the recommendations on the site. Theis notes the following positives about the horsehide…

  • They are stronger, yet thinner than cowhide, making them easier to conceal.
  • Horsehide does not absorb sweat like cowhide, because it is more dense and much more durable than cowhide.
  • The horsehide I use is 100% natural with no color or dyes to stain your clothing.

With my couple of weeks of usage, I would have to agree 100%. The thickness is about the same as one of my cowhide holsters and just has a better overall feel about it. Also, I’ve noticed that it hasn’t been absorbing a lot sweat, it has changed a little in color, getting a bit darker. So I would assume its absorbing a bit. But its not noticeable. I also often wear a white undershirt, so the holster is not rubbing directly on my skin, I just don’t like the feeling of any holster on my bare skin. But I haven’t noticed any discoloration on any of my shirts, even after wearing it for 10-12 hours non-stop.

I did decide to use some leather conditioner on the holster. Its something that I use on most leather items that I get. Its called saddle soap, and it’s amazing. You can get some here, Kiwi Saddle Soap The results turned out great… I didn’t go crazy with it, just gave it a little coating to help protect it. In a couple months I’ll give it another coating to clean/protect it. Just something I think will help the holster last longer.

Next up is the clips, I chose the metal clips because I’ve had good luck with them in the past, so I figured why change it. If it ain’t broke don’t fix it!

And finally, I also chose to get the normal muzzle coverage, not the full coverage, for more versatility between firearms. e.g. a Glock 17 and a Glock 23. If you get the full muzzle coverage for a Glock 23, the Glock 17 wont fit. So I figured having an open muzzle was the best choice. And so far, I am very happy with that choice. I’m not concerned about my pants getting a little dirty or anything like that.

For my preferences, I did make a couple modifications to the holster. The leather that protects your side from the slide of the gun stuck out a bit to far for my tastes… Basically it was interfering with my grip when trying to draw my weapon. Your results may vary, but I simply used a razor knife to cut away about a 1/4 inch of material. Here is what it looks like with that done.

After that, drawing was clean and easy, and I didn’t have any obstructions. Depending on your gun, your body type, and the size of your hands you may need to cut more, less, or none at all. But remember, you need to practice. A change in holster is a major thing, especially when your life may depend on it. It can alter everything about your shooting. So make sure to do dry fire practice, and then go to the range and practice. Practice. Practice. Practice!

So, other than the little trimming that I needed to do, I’ve found this holster to be one of the best I’ve ever used and I love it. The retention is great, out of the box, though Theis does give you instructions on how to remold some of the Kydex if you want to change the retention. He also sends out very detailed instruction on the holster and what to expect with it. Like anything new and good, it takes a little time to break in. Though most of the things he mentions that “might happen” never happened or I never noticed. For example, holster squeak.

Bottom line, check them out and give them a try. You will not be disappointed.

http://www.theisholsters.com

Meprolight Tru-Dot Night Sights

I finally decided to pull the trigger, so to speak, and get
some upgraded sights on one of my Glocks. It’s been something that I had been
thinking about doing, but was on the fence for a while… I was hung up on what
brand to get, where to get them installed, and then how would I adjust them if I
needed to (not that I could adjust the factory sights either).

I took a look at the Trijicon and Meprolight sights at one
of my local gun shops, City Arms East in Pleasant Hill, CA.
It was strangely one of the only places I could find that would sell them to
me, and actually install them. Northern California, amongst its many issues,
really is lacking places for gun accessories and gunsmiths. I like to at least
attempt to support local, or semi-local, brick and mortar businesses, but that
is becoming harder and harder these days. They have to charge so much, that in
most cases, I just can’t justify spending the extra money. But, I digress…

The reason I chose the Meprolight sights, really was just a
factor of availability. The gun shop had the correct ones for my gun, and would
install them while I waited (it took about 10-15 minutes). The difference
between the two brands are pretty small from what I could tell. This is not
really going to be an in-depth discussion on, or a comparison of the different
brands, but simply a discussion of what I like about the Meprolights and what
my impressions are of them now that I’ve used them briefly.

So first things first, the basic construction of them is good. They are sturdy and have clean
lines. They don’t appear to have any burrs or discrepancies with the actual
sight dots and the dots glow quite bright in the dark, even after being tucked
away and out of the light for quite a while.

I did some initial low light shooting, and the dots were
surprisingly bright, and very easy to get a good sight picture with. I know,
from trying this with the factory sights, I would lose the sights in the
background when it got dark. With these, that’s not going to be a problem, not
in the least.

The model that I have are the ML-10222 (for 10mm and .45
ACP) with orange rear dots and a green front dot. For more information on them
from Meprolight, take a look here. You can also
take a look at them on Amazon, here (the ones on Amazon are a different model, so make sure to get the right ones
for your firearm).

A thing to note, and I’m sure this will pass with more
practice and usage, but I’ve noticed that I occasionally have a hard time
focusing on the front sight when the sights are glowing brightly (in very low
light situations). I think this is mostly related to the sensitivity of my
eyes, and it’s a different experience seeing these illuminated dots when its
dark. I can’t really explain the specifics, but it’s something that I thought
was worth mentioning. With a couple of dry-fire practice sessions, it’s getting
less and less pronounced. So I think with more training and getting used to
them, it will be a complete non-issue. This goes to show you that NOTHING makes
up for constant and consistent training with your firearms, especially if your
life depends on it.

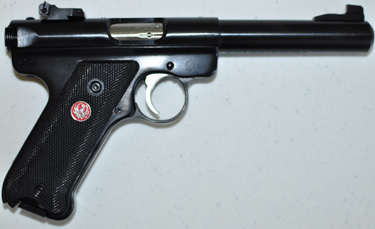
Ruger Mark III Target

Specifications

Cat. #: MKIII512
Mod. #: 10101
Material: Alloy Steel
Finish: Blued
Barrel: Target
Barrel Length: 5.50″
Overall Length: 9.75″
Weight: 42.00 oz
Caliber: .22 LR
Capacity: 10
Grips: Checkered
Front Sight: Fixed
Rear Sight: Adjustable
Height: 5.50″
Width: 1.20″
Twist: 1:16″ RH
Grooves: 6

Read more