Customizing ClearPass Skins
TL;DR
ClearPass guest skins are HTML/CSS/JS/image bundles rendered inside the ClearPass container using PHP Smarty for dynamic logic. Here's the essential rundown:
- What it is: The skin is the branded shell around ClearPass Guest workflows — customizable out of the box, via HPE's Skins Service, or with expert help (like ours)
- Where to configure: Admin > Plugin Manager > Manage Plugins > Configuration on your chosen skin.
- Easiest customization path: Start from an existing skin (e.g., Galleria v2) and override styles with CSS wrapped in Smarty {literal}{/literal} tags so curly braces don't break the templating engine.
- Logo swaps: Upload your new logo via Content Manager, then point the header's <img> tag to public/your-logo.png.
- Key Smarty variables: $title,$nav_top, $nav_active_menu, $current_lang, $script_name, and helpers like |escape (security-critical for user-facing text).
Under the hood, ClearPass skins are a set of HTML, CSS, JavaScript and Images running inside of a ClearPass container that utilizes PHP Smarty for advanced customizations and logic.
The ClearPass skin is the shell around the ClearPass interface, usually focusing on Guest workflows. There are multiple ways to customize this, either out of the box, or via the ClearPass Skins Service provided by HPE. Santomieri Systems can also help with this process, more information on that on our Skins Customization Service page.
Skin Configuration
All skins in ClearPass have a base configuration that can be accessed via the Plugin Manager interface. This can be accessed in the navigation by going to Administrator > Plugin Manager > Manage Plugins > Then selecting Configuration on the skin you wish to update.

The options you see will range from very simple to very complex, depending on the skin. For example, the default ClearPass skin will allow you to pick a few colors and that's basically it. While the Galleria skins will give you many additional configuration options. If you have a custom skin, you will also likely have access to update specific sections of your skin and inject custom styles and scripts.
Styling an Existing Skin
The easiest and most reliable way to customize ClearPass is to start with an existing skin and restyle it as you need. This can be done in a lot of ways, but the general best practice is using CSS overrides in the Skins configuration. This is most likely the best way to go about making updates for a rebrand or change in colors. You can override most styles used by elements and make customizations as needed. Generally speaking, this is how the skinning process works.
Almost all skins provide a way to add custom CSS into the header of the page, as well as custom content into sections. All custom CSS generally needs to be added using proper PHP Smarty syntax. For our examples we're going to use the Galleria v2 Skin in most cases.
{literal}
<style type="text/css">
  button { background-color: #f8d1d0; }
</style>
{/literal}
The key element to note is the {literal}{/literal} blocks. These allow you to include curly braces ("{" and "}") inside of smarty processed code, something that is needed for CSS.
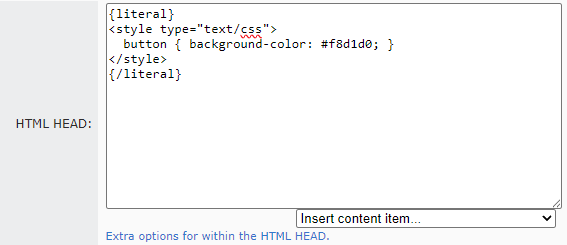
If you placed this code into the HTML Head section of your skin, buttons, if there's no more specific CSS, would have a red background color.
Basic coloring and simple style modifications are generally as simple as that. Adding some CSS to the configuration.
Common CSS Overrides
Here's a list of the most common CSS overrides needed to begin really customizing the ClearPass UI.
.nwaImportant {
    font-size: 15px;
    font-weight: bold;
    color: #ff3649;
}
.nwaUsername {
    font-weight: bold;
    color: #0275d8;
}
.nwaPassword {
    font-weight: bold;
    color: #0275d8;
}
.nwaInteractiveProgressBarComplete {
    background-color: #0275d8;
}
.nwaInfo {
    color: #666;
}
table.nwaContent,
div.nwaContent {
    border: 1px solid #eceeef;
    background-color: #fff;
}
th.nwaTop,
div.nwaTop {
    background-color: #fff;
    color: #000;
}

button, input[type=submit], input[type=button] {
    color: #fff;
    background-color: #337ab7;
    border: 1px solid #337ab7;
}
button:hover, button:active, button.active, button.disabled, button[disabled], input[type=submit]:hover, input[type=button]:hover {
    color: #fff;
    background-color: #286090;
    border: 1px solid #286090;
}
button.disabled, button[disabled], button[disabled=disabled], input[type=submit]:disabled, input[type="button"]:disabled {
    opacity: 0.4;
    filter: alpha(opacity=40);
    cursor: default;
}
Changing a Logo
One of the most common asks for updating a skin is to replace the logo. If you have a custom skin, there are likely many ways this can be done, but, with most things technical - it depends on the specifics.
Most modern skins created by HPE expose the header of the page into a configuration element. Depending on how your skin was created and the branding of your skin, how complicated of an update this will be, can vary wildly.
Let's use the following header configuration as a base example for a custom skin.
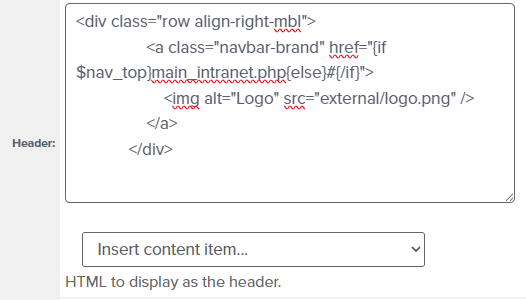
<div class="row align-right-mbl">
  <a class="navbar-brand" href="{if $nav_top}main_intranet.php{else}#{/if}">
    <img alt="Logo" src="external/logo.png" />
  </a>
</div>
In this code, the key element to focus on is the img tag. This is what actually renders the logo image in the template. We can also see that the logo is linked and uses some smarty to change the link based on if the user is on a page that supports navigation (generally an admin page) or not.
Any files that are part of your packaged skin are generally bundled with the skin plugin, the external file path is a special path that gets mapped to these internal skins files.
To add a new logo, simply upload it to the ClearPass server using the Content Manager, which can be accessed by navigating to Configuration > Content Manager > then selecting Upload New Content
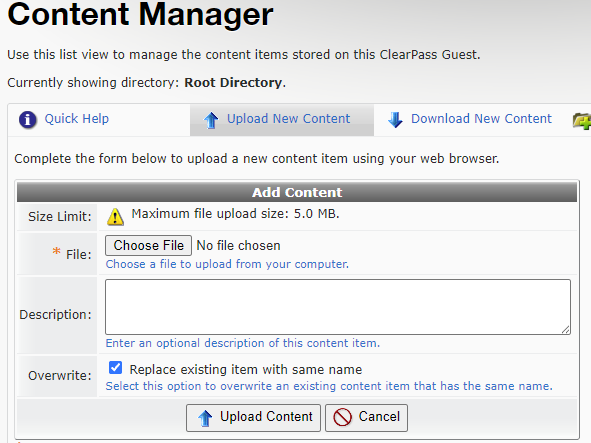
Once you have your logo uploaded to the content manager, it will be accessible using the public url path in your skin. So if you uploaded the logo "new-logo.png", you would update the path in the img src in the skin configuration header section to be public/new-logo.png.
Here is what that looks like when completed.
<div class="row align-right-mbl">
  <a class="navbar-brand" href="{if $nav_top}main_intranet.php{else}#{/if}">
    <img alt="Logo" src="public/new-logo.png" />
  </a>
</div>
Once you save your configuration changes, the new logo will immediately be visible in any guest workflows or configurations that have the skin configured for use.
Common ClearPass Smarty Variables
Below is a list of some of the common helper smarty variables and functions that can be used to help customize your skin.
- $title
- This variable is set to the title of the currently active page. This is what is set in ClearPass for the specific page and is generally used in the "Title" section of any guest skin. When this is displayed, it is often using the |escape helper listed below.
- {$variable|escape}
- For any and all text that you are displaying that may be unknown, passed via URL, or entered by a user, you should use the escape helper. This will escape html characters and help limit html injection / cross-site scripting attacks as well as possible display issues.
<h1>{$title|escape}</h1> - $nav_top
- An array of navigation items available to the user - only exists when on admin pages with navigation.
- $nav_active_menu
- An array of the currently active menu item tree. This is often used to get the top level active page name.
{if $nav_top} {assign var=ix value=$nav_active_menu[0]} {$nav_top[$ix].name} {/if} - {'Y'|date}
- Simple smarty to print out the current year in YYYY format.
- $current_lang
- The current language code for the user selected language of the page they are viewing, for example, "EN".
- $current_language_rtl
- True when the current user language is a Right-to-Left (RTL) language. This is often useful when attempting to build skins that need to change layout based on the language selection.
- {nwa_script src=jquery.min}
- If you need to use jQuery in your skin, this helper will include it. There are elements of ClearPass that also use jQuery, so if you manually include it - they can step on each other. Using the above smarty script will only add jQuery if it's not already included with something else that is using it.
- $_wpl.browser.small_screen
- True when the users viewport is considered a "Small Screen". It's generally recommended to make your designs responsive using proper CSS media queries, but if you have logic that needs to change if the user is on a small screen device, this is the way to do it.
- $script_name
- This will return the base script name, generally the page name without the file extension. This can allow you to make customizations that are page specific. Sometimes useful for shared workflows.
- $smarty.server.QUERY_STRING
- This will give you the entire query string that is on any given page, this is useful for parsing and performing custom actions based on workflow, or, creating links that pass along URL parameters in more complex and custom guest workflows.
- {$variable|rawurlencode}
- The rawurlencode helper will encode things into URL format, this is useful when crafting links or other guest registration workflow steps.
- $smarty.get.my_param
- In addition to the entire query string, you can access specific elements of the query by directly naming them... for example if you wanted to control the layout of a guest workflow when a "workflow" query parameter is passed, you could do something like this.
{if $smarty.get.workflow == 'step1'} <div>Step 1</div> {/if} - $gsr_page_name
- The current guest self registration page name. This corresponds to your naming inside of your guest registration configuration UI in ClearPass.
- $remote_addr
- The users IP Address.
- {debug}
- If you add this to a skin or guest workflow, you will get a popup that opens with smarty debug information that will include all available smarty variables on a given page. Use this cautiously and don't forget to remove it after you get the information you are looking for.