Ubiquiti UniFi Hotspot Customization
March 9, 2015
TL;DR
Customizing the UniFi captive portal requires direct modification of existing HTML, CSS, and JavaScript files within the site-specific portal directory to improve user experience and branding.
- The core files are located within /opt/UniFi/data/sites/{{site_name}}/portal, with index.html acting as the primary landing page.
- Key pages include index.html (main content) and payment.html (billing entry), which determine the visual layout and user flow.
- Billing parameters, such as usage rates and package details, must be configured in the messages.properties file.
- Changes to the billing package settings in messages.properties require manual synchronization with the package display details in index.html.
After getting a Ubiquity UniFi AP and controller setup, I decided to get the hotspot running, just for the fun of it.
The default UniFi hotspot is not bad, as far as a free setup goes, but it's not very "clean" as far as a web system goes. I'm sure as the product develops along it will get cleaned up. But for a businesses use, out of the box, there is a lot to be desired.
So what I decided to do was to clean up the HTML, integrate a responsive UI template, and get things matched up to my website a little better with a logo and a similar color scheme.
I have my controller installed on a Linux (CentOS) build, so most of what I have for where to find files, etc will be in Linux formats. But you should be able "translate" them to whatever OS or installation you have setup.
For my installation, everything is installed in the /opt/UniFi directory.
For each site you have, you can configure a custom Hotspot... So the actual Hotspot files are in the following location, /opt/UniFi/data/sites/{{site_name}}/portal for each site.
For each site, there is a default set of files.
drwxr-xr-x. 2 root root 4.0K Feb 26 16:34 bundle
-rw-r--r--. 1 root root   31 Feb  9 15:51 fail.html
drwxr-xr-x. 2 root root 4.0K Feb 26 16:48 images
-rw-r--r--. 1 root root 8.5K Feb 27 09:17 index.html
drwxr-xr-x. 2 root root 4.0K Feb 26 16:34 js
-rw-r--r--. 1 root root 4.5K Feb 27 09:17 payment.html
-rw-r--r--. 1 root root 2.4K Feb  9 15:51 README.txt
-rw-r--r--. 1 root root  860 Feb  9 15:51 reset-min.css
-rw-r--r--. 1 root root 3.8K Feb 27 09:11 styles.css
For the most part, the files are pretty explanatory, the index.html file is the main landing page when a person attempts to access the Hotspot, the payment.html is the page a person is directed to to enter CC information to pay for access usage and the fail.html is what a person is redirected to if there is a failure (though it just redirects to display the index.html page). Other than that, everything is just supporting CSS, JavaScript and images. You can add custom pages as you want, you just have to create the navigation structure in some form.
messages.properties
There is one exception to the "normal" file structures... in the bundle directory there is a messages.properties file. This file contains settings and values used by the UniFi system to identify payment types and other bits of data needed to be passed back to the UniFi system. This is where things like the rate at which people are billed for usage is set.
Below is the contents of my messages file, for reference. I tweaked the rates that packages are billed (you can see this in the package.1 and package.2 areas). The package settings have to be changed in conjunction with changes to the index.html file (display of currency and time limits is not dynamic).
## package 1
# amount is in US dollars
package.1.amount=2.99
# default currency is USD
package.1.currency=USD
package.1.hours=8
# what's shown in the Hotspot Manager
package.1.name=Basic 8HR
# what's shown on the credit card statement
package.1.charged_as=Hotspot 8-hour Wifi

## package 2
package.2.amount=4.99
package.2.hours=24
package.2.name=Premium Daypass
package.2.charged_as=Hotspot 1-day Wifi

InvalidAccessPoint=Please connect from guest wireless network
InvalidPassword=Invalid Password
InvalidVoucher=Invalid Voucher
VoucherQuotaExceeded=The voucher has been used too many times
VoucherExpired=The voucher has expired
UseVoucher=I have a voucher
PasswordRequiredForWirelessAccess=A password is required to access the wireless network
PaypalCancelled=Payment cancelled
FreeTrialUsedAlready=Free trial has ended

WelcomePage.Title=Action Required - Guest Access
WelcomePage.FailedInternal=The hotspot is not configured correctly

PaymentPage.InputCredit=Please input the credit card information
PaymentPage.InvalidCardNumber=Invalid credit card number
PaymentPage.InvalidExpirationMonth=Invalid expiration month
PaymentPage.InvalidExpirationYear=Invalid expiration year
PaymentPage.InvalidCCV=Invalid security code
PaymentPage.InvalidCountryCode=Invalid country code

PaymentPage.FailedInternal=Unable to process the payment
README.txt
Now that we know the base files, and where they are, lets take a look at the README file.The README file explains the basic files and what the custom variables the UniFi system uses.
The sample portal is, while useful by itself, written in a way that it
demonstrates most features in the simplest format.

# directory structure
index.html    : the main landing page
bundle/messages.properties: for localization and hotspot package specification
payment.html  : for credit card information submission. requires https, also
                served as an example of additional .html page
fail.html     : default page when there's error handling guest login

supporting files:
images/
js/
reset-min.css
styles.css


===== unifi tags =====

====== <unifi var="name" /> ======
a few vars are populated where you can use <unifi var="varnames" /> to render it in the HTML page

* auth:            none | password | hotspot
* auth_none:       false | true
* auth_password:   false | true
* auth_hotspot:    false | true

* voucher_enabled: false | true
* payment_enabled: false | true

* package:         the package id (from POST or GET)
* mac:             guest's MAC address
* ap_mac:          AP's MAC address
* ap_name:         AP's name
* map_name:        AP's location (name of the map)
* ssid:            the SSID of the wireless network

* error:           error message
* has_error:       false | true


====== <unifi include="header.html" /> ======
to include another HTML page


====== <unifi if="name" eq="value"> ... <unifi else="var" /> ... </unifi> ======
the simple if/then/else logic to determine if a section of the page should be shown
use <unifi if="!name" eq="value" > ...</unifi>


====== <unifi txt="InvalidPassword" /> ======
text localization, see bundle/messages.properties


====== <unifi url="payment.html" https="true" /> ======
generates the URL (and possibly change it to HTTPs) relatively


====== /guest/login ======
this is the URL the user will POST to get authorized, it takes the following parameters:

* by:               type of authentication (for hotspot): voucher | credit | paypal
* package:          package id (for hotspot)
* voucher:          voucher code (for hotspot/voucher)
* cc_xxxxx:         credit card information (for hotspot/credit):
* landing_url:      use a dynamic landing URL (which can be constructed by using vars)
* page_error:       relative URI when error occurs (fail.html is the default)


credit card related fields:
cc_firstname, cc_lastname, cc_number, cc_year, cc_month, cc_ccv2
cc_addr1, cc_addr2, cc_city, cc_state, cc_zip, cc_country, cc_email
As you can probably see, there is a pretty decent level of customization you can do to the pages using the UniFi variables, etc... It just depends on what you are really looking to do.
For my implementation, I was just looking for something simple and to have a little continuity with my website, so a lot of the custom stuff doesn't really apply. But it's there for you to use if you want.
Bootstrap
For my updated portal, I decided to use Bootstrap CSS for a simple (and powerful) responsive CSS template.
I only use the HTML/CSS portion of Bootstrap, it comes with various JavaScript options, etc... But to keep things lean, I skipped them.
To add Bootstrap to the system you simply need to upload the files to the portal directory and then add them to your index.html and payment.html files.
<meta name="viewport" content="width=device-width, initial-scale=1, maximum-scale=1, user-scalable=no" />
<link rel="stylesheet" type="text/css" href="bootstrap.css" />
With that html added to the header of the pages, you can use the standard bootstrap code like you would in any webpage. If you don't know how to use bootstrap, take a look here.
UniFi Options
The existing UniFi page has everything structured and "displayed" based on the configuration of your site. Because of that, I definitely recommend using the existing UniFi code as a model and just updating it to work with your layout. Starting from scratch could be cumbersome.
You can also add/remove optional components, for example, if payment is enabled, there is a default section that allows a person to "Try it for free".
 <unifi if="payment_enabled">
	<form name="input" id="submit-form" method="post" action="login">
		<h2>or try it out for free</h2>
		<div class="form-controls">
			<input type="hidden" name="package" value="3" />
			<!--
			<input type="hidden" name="landing_url" value="https://www.yourdomain.com/?ap=<unifi var="ap_mac" />" />
			-->
			<input type="submit" value="2-hour Free Trial" class="button requires-tou" name="byfree" />
		</div>
	</form>
</unifi>
You could add a "display:none;" or simply remove the code if you wan't if you do not wan't people to be able to try it for free. Everything else in the system works much the same way... Optional blocks of code are enclosed in <unifi if=""> ... </unifi> code that handles when they should be displayed based on options set in the Admin configuration and options/values are inserted using <unifi var="" /> or <unifi txt="" /> code elements.
Other Customization
Other than that, you can add and/or modify the code in the portal to your hearts content... I would recommend keeping it simple, but you can customize things as much or as little as you like.
Everything else just works like a normal web site...
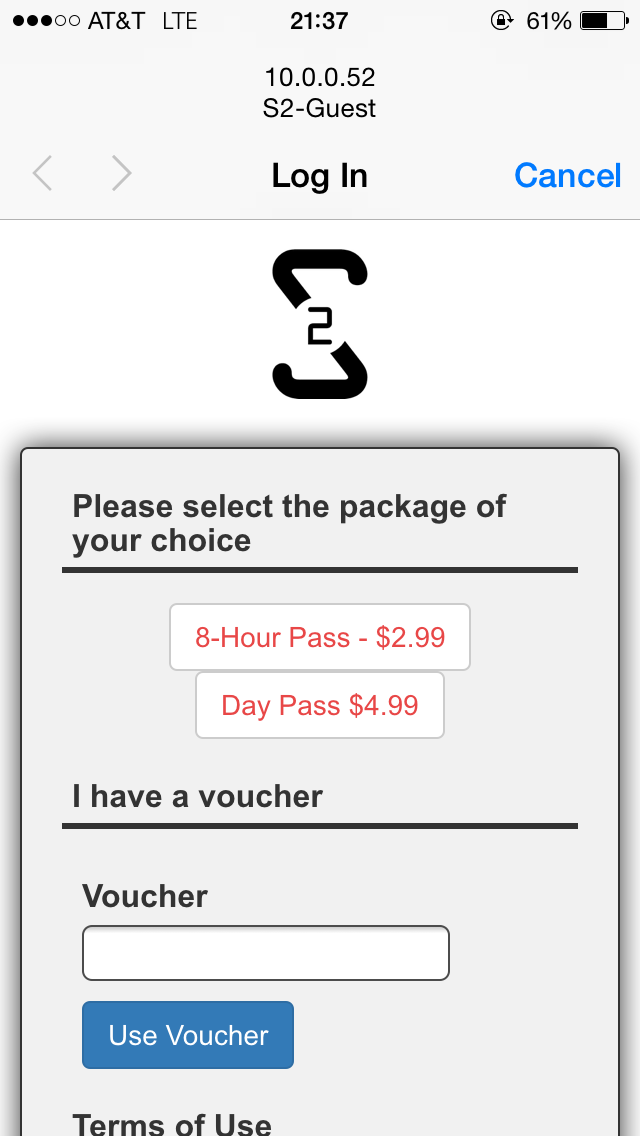
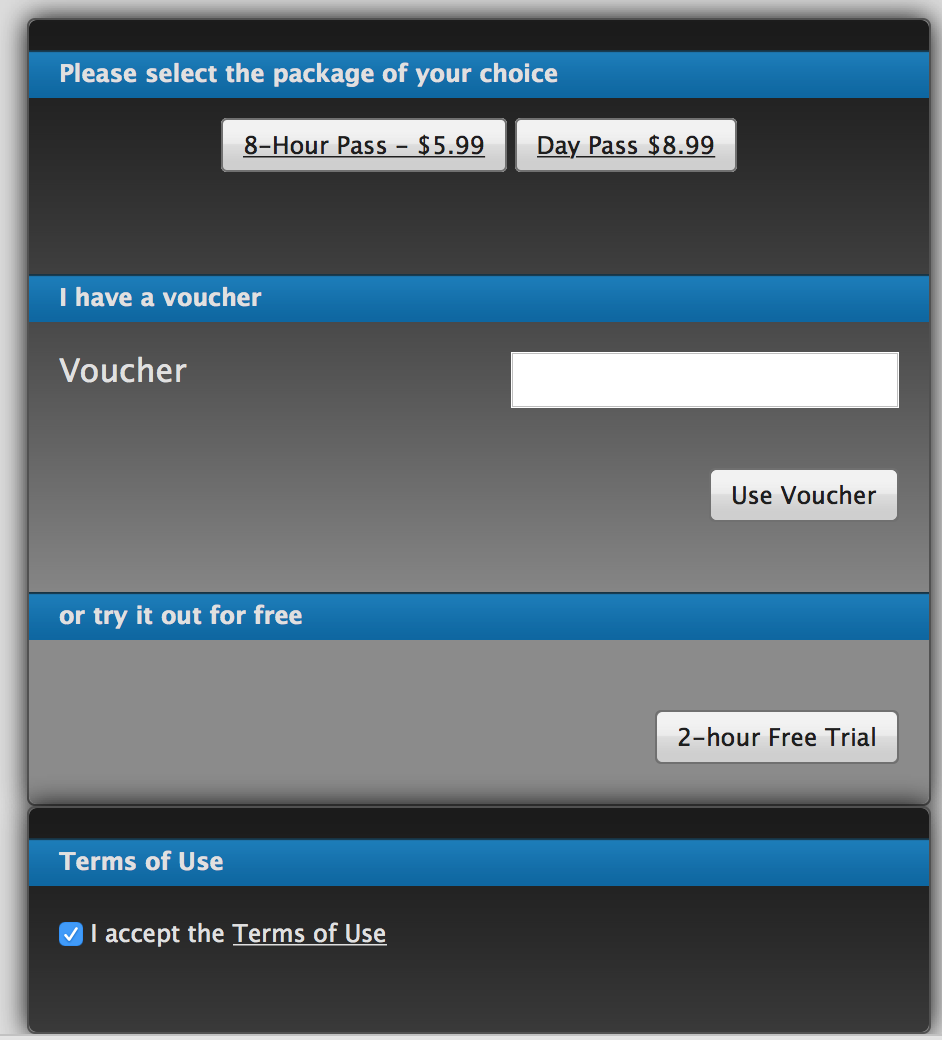
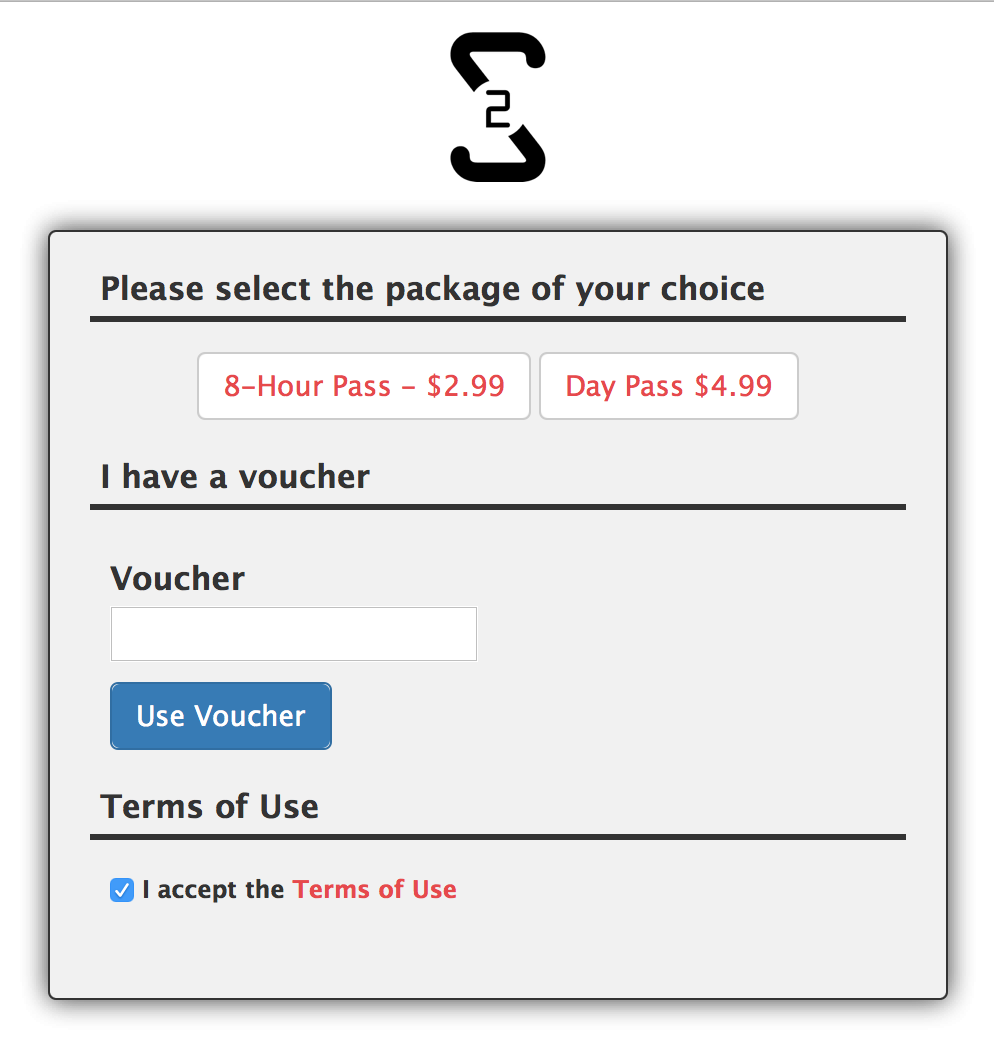
Here is what the original UniFi Hotspot page looked like (left) and the new one (right).
Source
You can download my sample portal configuration, here (zip format, 147KB).Use at your own risk. The sample is just a sample, you may have issues that I have not detected, etc. So make sure to test and verify everything works correctly with your installation.
If you are looking for Ubiquiti hardware, Amazon has proven to be a great place to get it.